Kite Compositor is a native animation design and prototyping application for Mac. It is built directly on top of Apple’s Core Animation framework which provides all of the heavy lifting to create beautiful interface animations. It is the same framework that is used on iOS, macOS, and tvOS to do graphics compositing and interface animation.
Kite offers a number of basic building blocks like layers, animations, and actions that allow you to assemble your interface interactively like Lego pieces. In addition, for those with a technical background, Kite exposes a JavaScript scripting engine to further fine-tune every detail of your design.
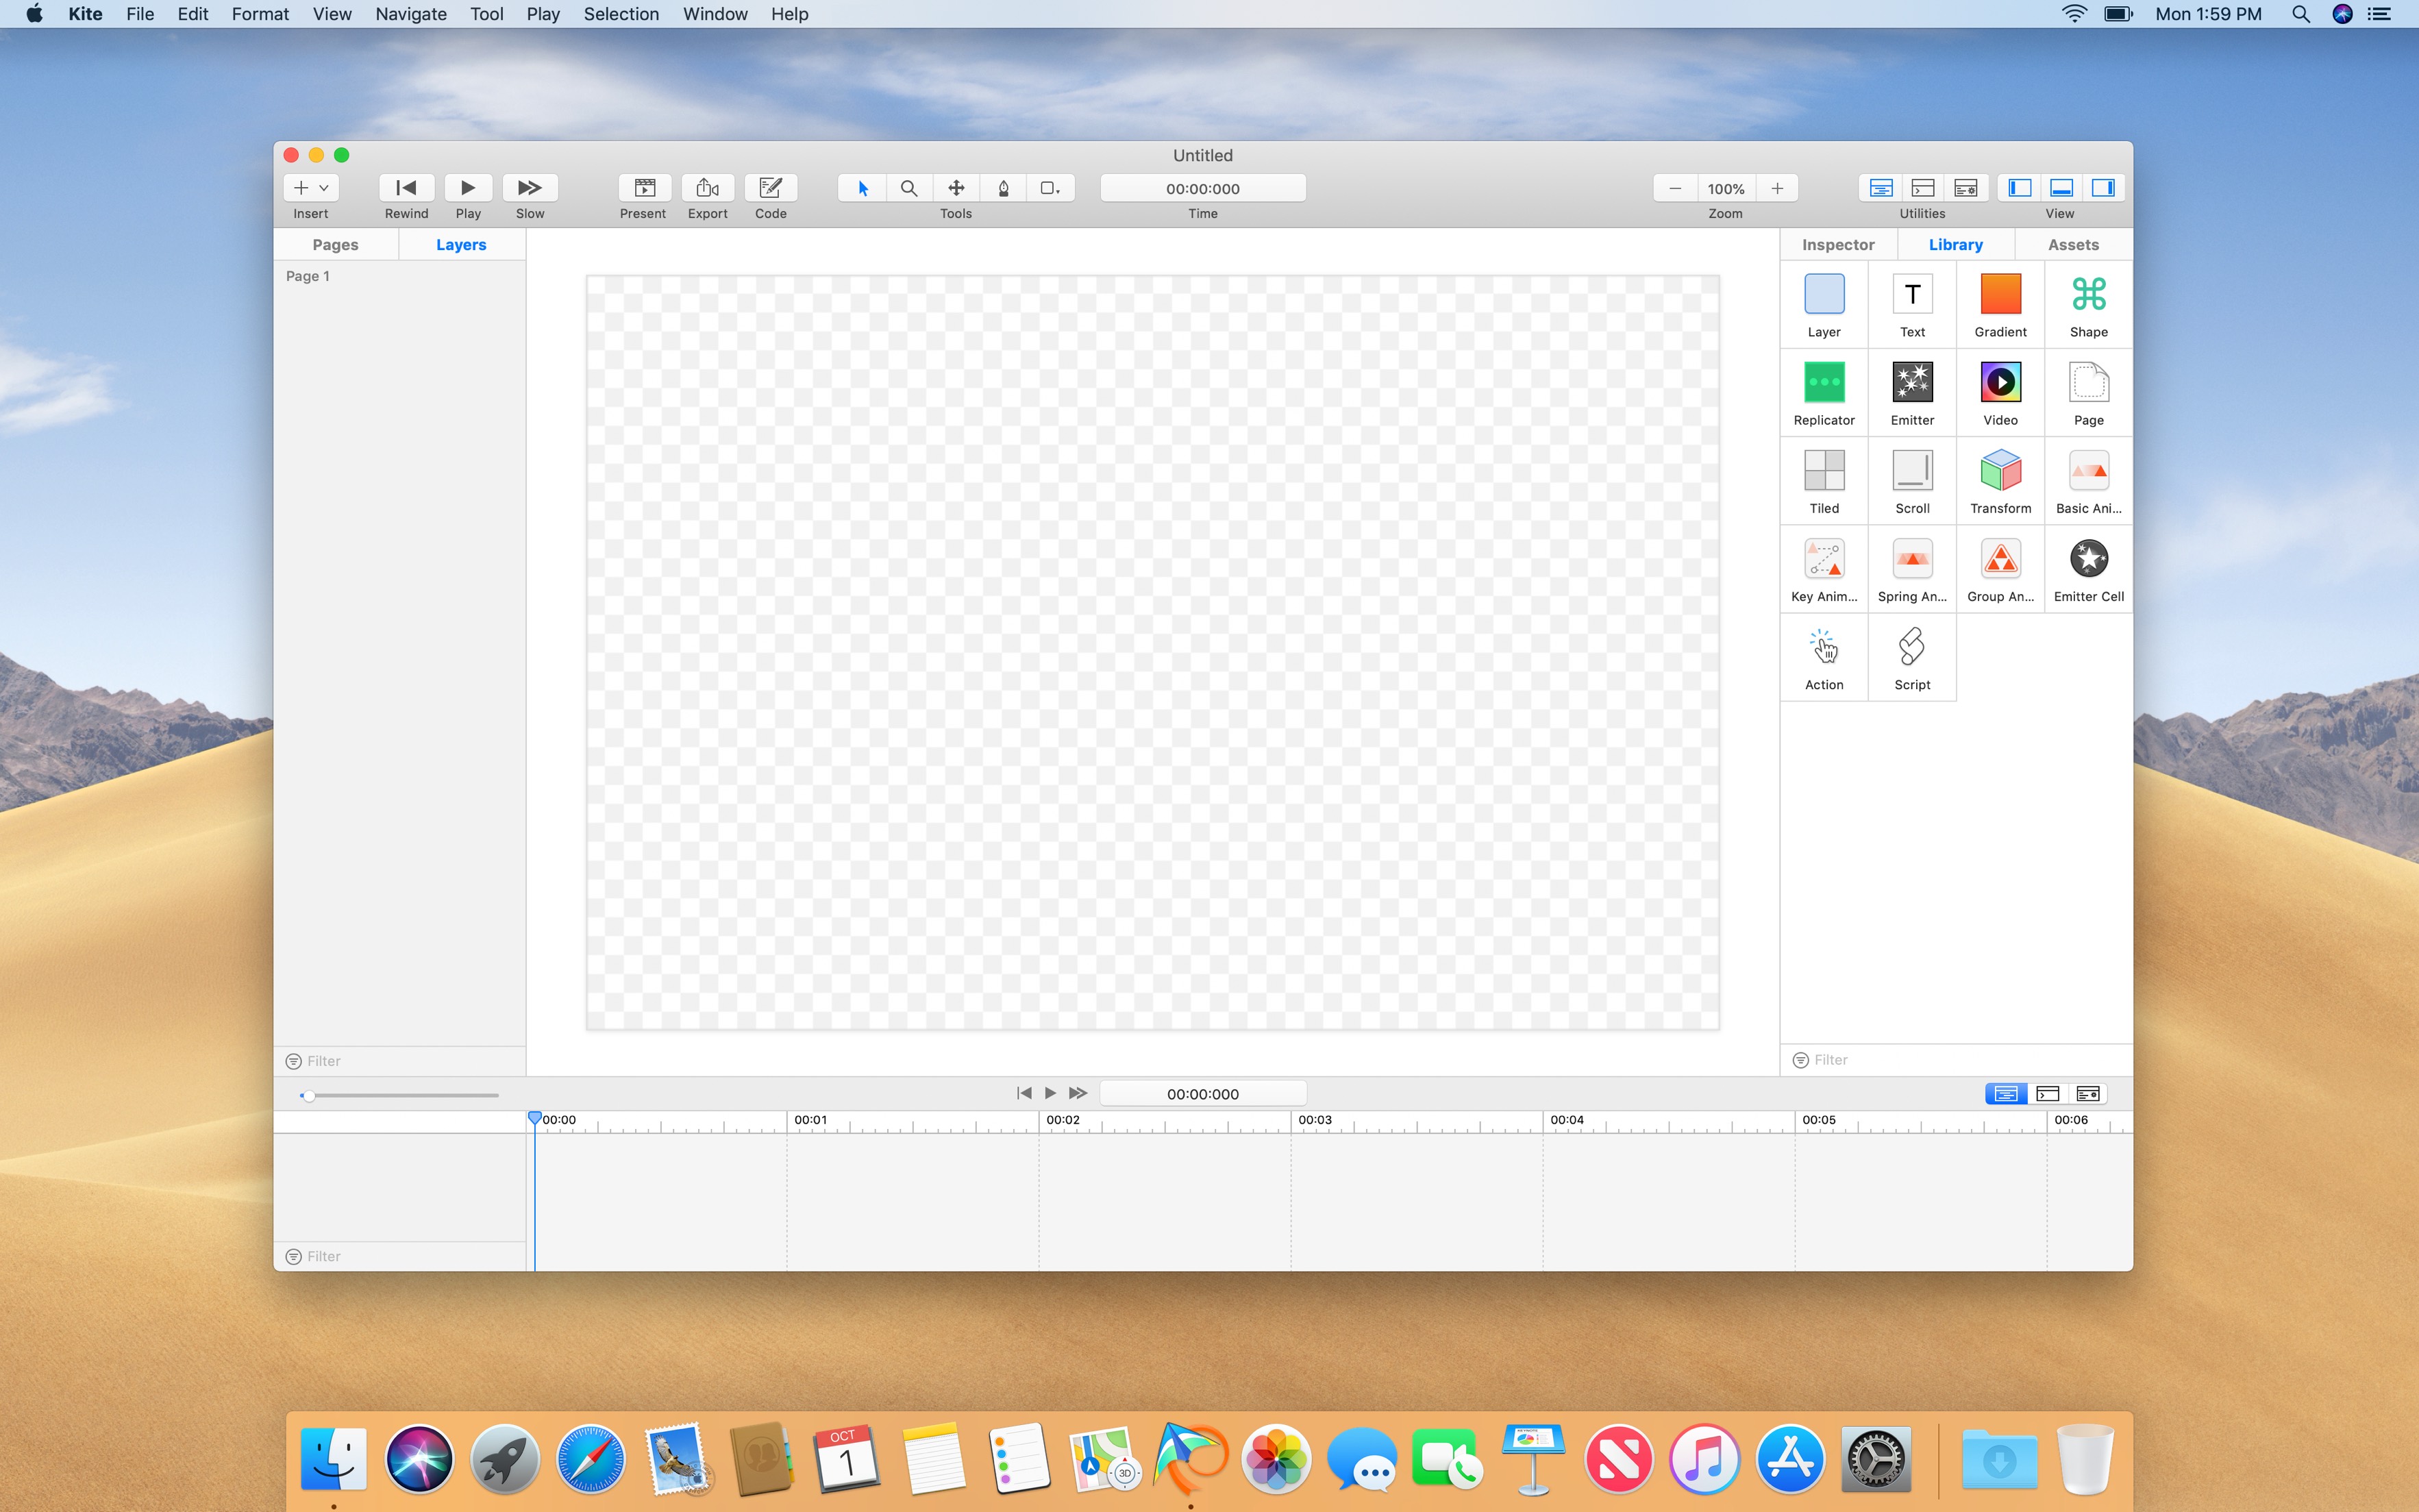
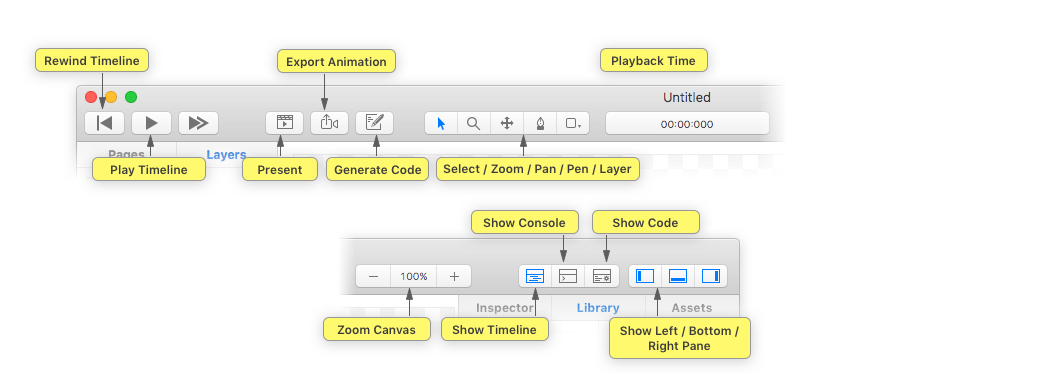
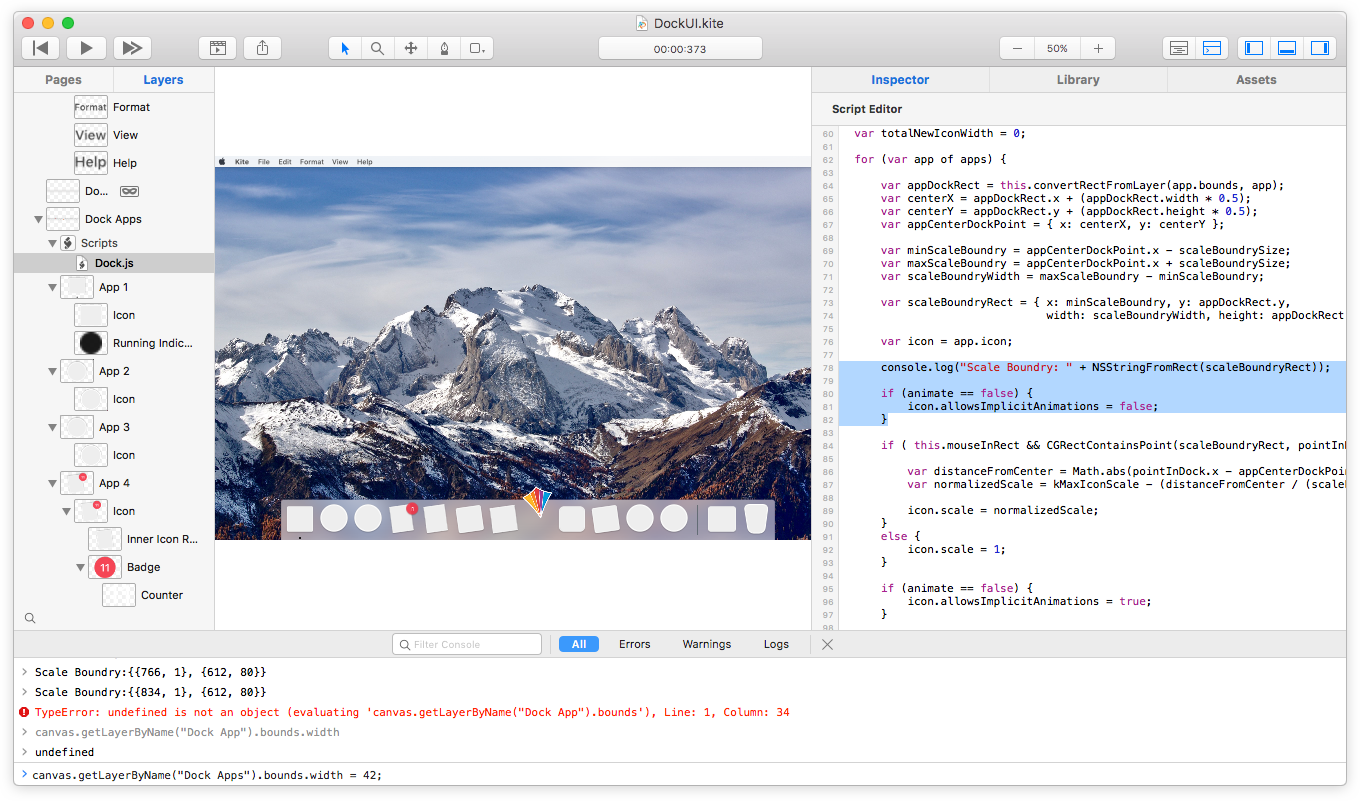
If you have used other Mac design applications like Sketch, PaintCode, or Keynote, Kite's interface should feel right at home. You organize your design as a tree of layers that appear in the source pane on the left. Inspect and change object properties in the inspector pane on the right. The center canvas allows you to select objects and use the different tools provided in the toolbar. The bottom utility pane displays the animation timeline and JavaScript console.
Since Kite was built with the intention of exposing all of the power of the Core Animation APIs to the user, the Core Animation documentation will serve as a great second reference if you need to lookup the meaning of a layer property or an animation value.
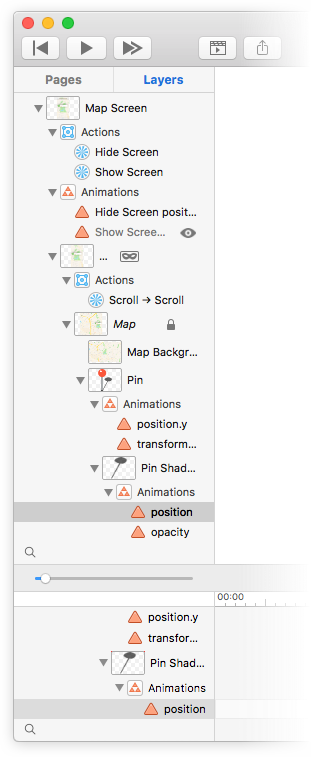
The layer list shows you each layer in your document and their childen. A layer can have several types of childen including animations, actions, or even other layers. A layer with child layers forms the tree structure you see in the screenshot below and is the fundamental model of how you organize your design. To learn more about layers, see the Layers section.
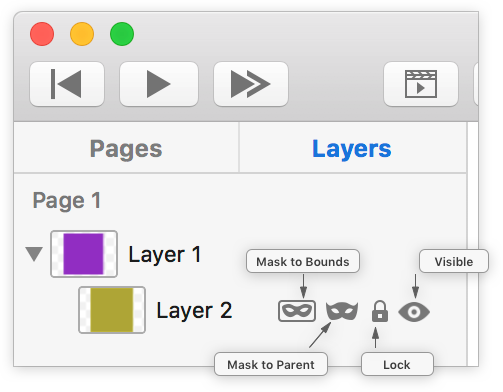
The layer list includes several action buttons on each item when hovered over by the mouse. Most items can toggle their locked and visibility status. Additionally, layers can mask their parent layer as well as mask to their bounds.
Lock / Unlock – Lock the item on the canvas from being moved by the mouse.
Show / Hide – Hide the item from view on the canvas. For layers this makes the layers content and children not visible. For animations, this removes the animation from the scene. For actions, it will prevent the action from triggering during presentation playback.
Mask to Bounds – Clip all content from the layer and its subtree that extends outside of the layer's bounds.
Mask Parent Layer – Use the visible portion of this layer to mask the content and subtree of its parent layer.
Pages allow you to have multiple layer hierarchies with their own independent timelines within the same Kite document. Each page can have a different canvas size and layer hierarchy but is also able to share document-wide assets like images and videos with other Pages.
Pages can link to other pages via Actions. You can setup a "Transition to Page" action that will transition from the current page to another when an event is triggered.
Page Layers are a special layer type available in the Library that can 'stand-in' for another whole page at design-time. At presentation-time the Page Layer is filled in with the layers of the referenced page. Page Layers allow you to perform fully customizable page transitions using your own animations.
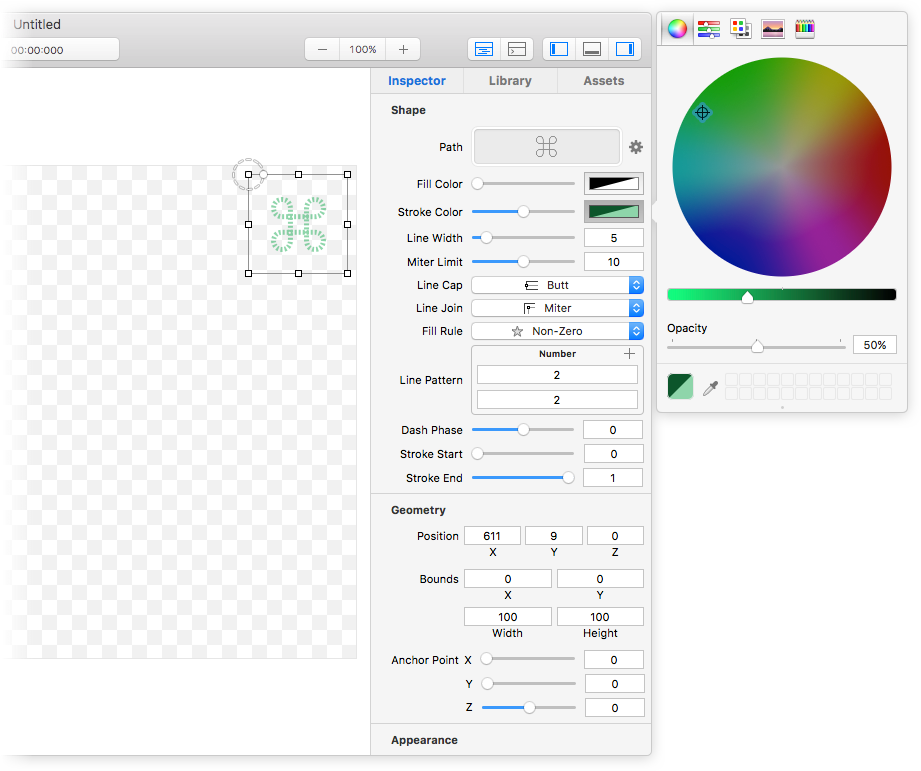
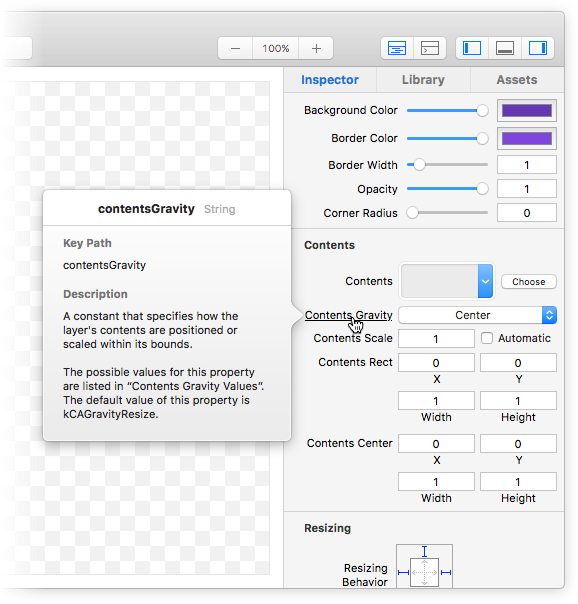
The object inspector allows you to edit the properties of the items in your document like layers, animations, and actions. Multiple objects can be selected and inspected at once for fast mass-updates to similar items. Each object's properties are organized in different panes like Geometry properties, Appearance properties, Rendering properties, etc. These panes can be collapsed when not needed to provide more UI real-estate for the ones you do need.
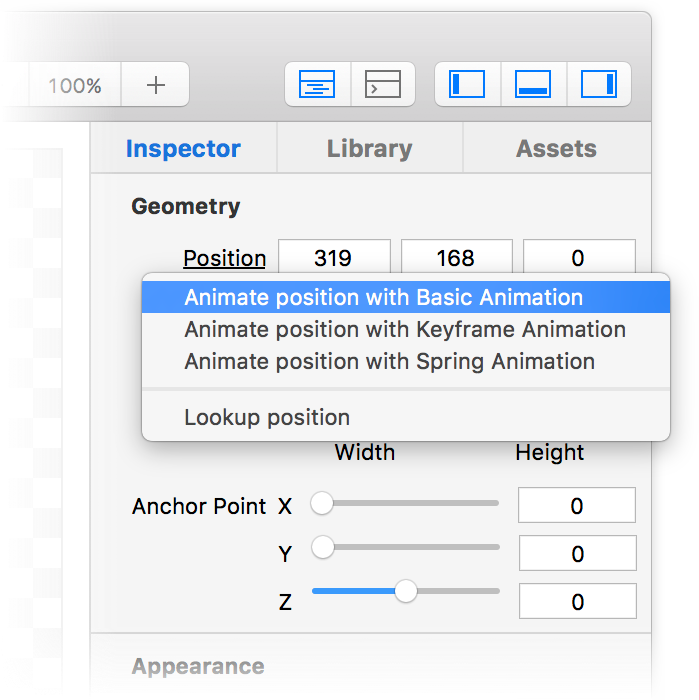
Many properties in the inspector have associated Quick Actions you can perform by clicking on the property label. For example, animatable properties like a layer's position property can provide a quick way to animate the layer's position with several different types of animations. In addition, properties with built-in help have a way to quickly lookup what effect the property will have when modified.
Text fields in the inspector support common math operations in-place so you can easily calculate values using math operators like addition +, subtraction -, multiplication *, division /, parentheses groupings ().
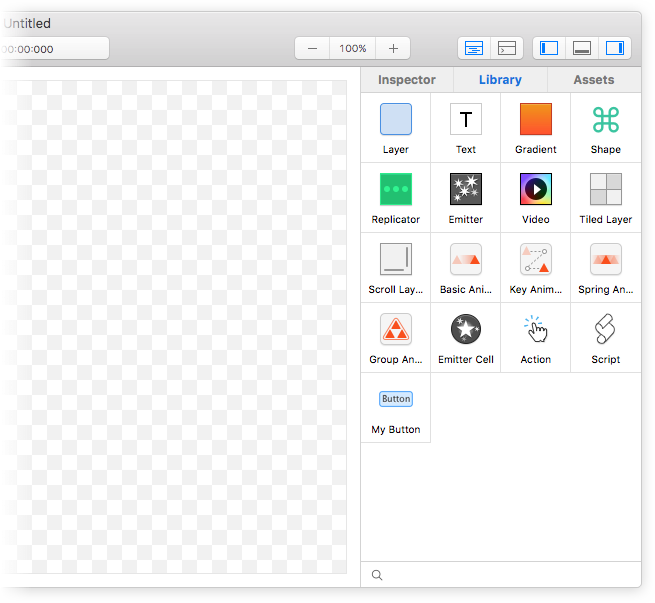
The second tab of the inspector pane is the Library. The library holds the collection of building blocks you can drag and drop onto the canvas to construct your design.
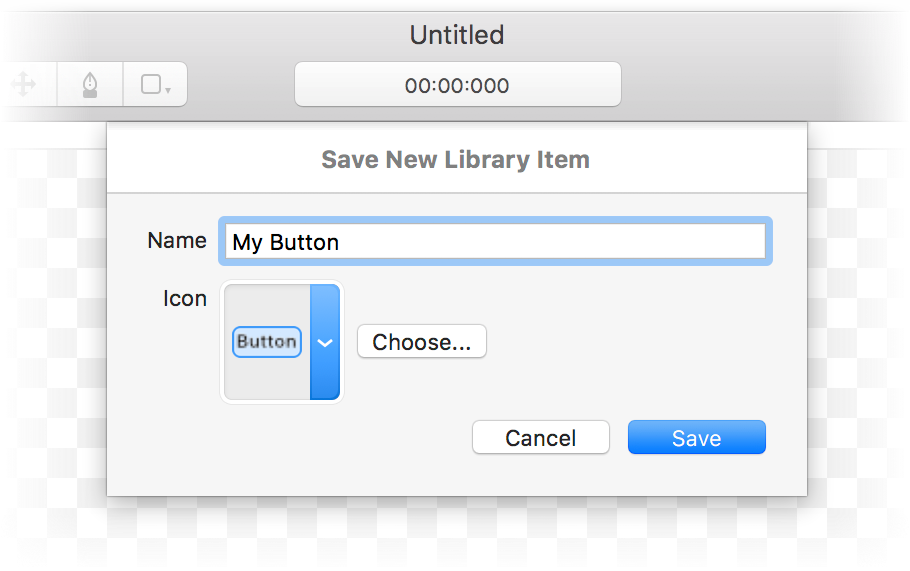
Saving Custom Library Items
You can also save arbitrary pieces of your layer tree into your own library item. To make your own item, select the items you want to save and then click Selection > Save to Library... in the main menu or by right clicking directly on the layer in the canvas.
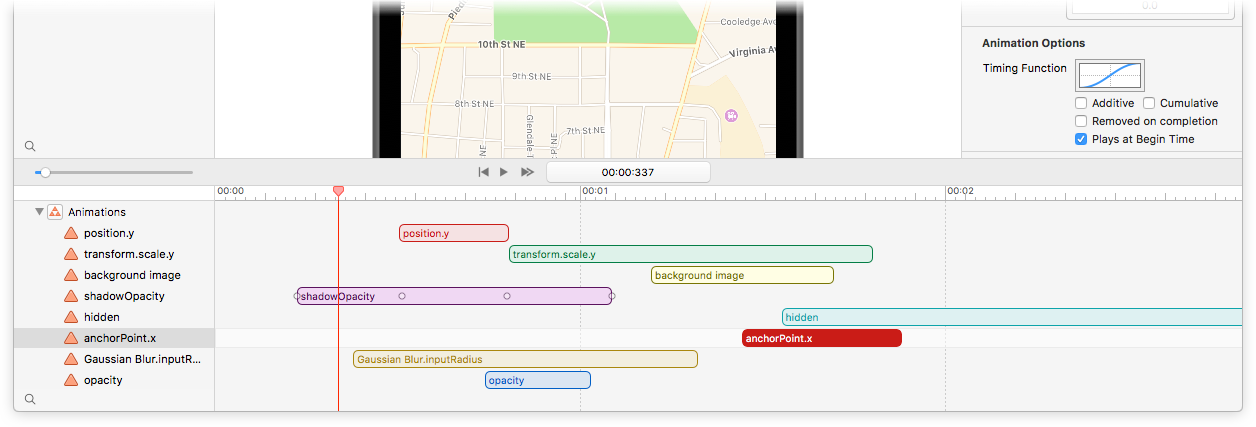
If you have used track-based timeline editors in other applications like FinalCut Pro or Motion, Kite's timeline will feel familiar. You can drag tracks to sync-up animation times and keyframes in relation to one another. Tracks and keyframes will snap to each other at appropriate time periods so you can set precise timings for your animations.
Timeline Loop Selections
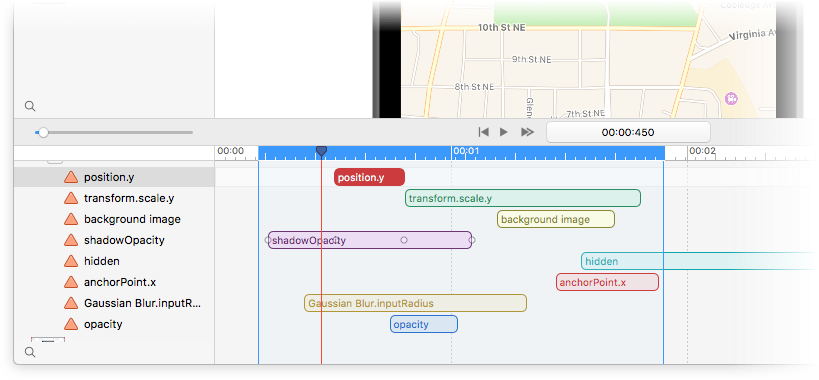
While iterating on an animation's duration, springy-ness, timing curve, etc, it is often helpful to loop a portion of the timeline while you adjust its values. By making a Loop Selection in the Timeline, you can select a range of time to repeat over and over.
To make a loop selection, simply drag anywhere on the timeline that doesn't have a track. Click an empty portion of the timeline to remove the loop selection.
Layer Tracks
A layer's track duration corresponds to its visibility on the canvas. By default, layers have a very large duration so they are present throughout the entire animation. However, you can change this by enabling layer tracks in the timeline and adjusting their length.
By default, Kite doesn't show tracks for layers in the timeline pane. If you want to see tracks for each layer, you can turn them on in the applications Preferences. Click Kite > Preferences... in the main menu and then check "Show timeline tracks for layers" in the General preferences pane.
The JavaScript console is the 2nd view located in the bottom utility pane. The console is where you will see the output for your scripts when they are evaluated at presentation time. You can show the console by clicking on the console button in the toolbar.
While typing at the command-line in the built-in console, you can press the up arrow on your keyboard to cycle through the last few commands entered.
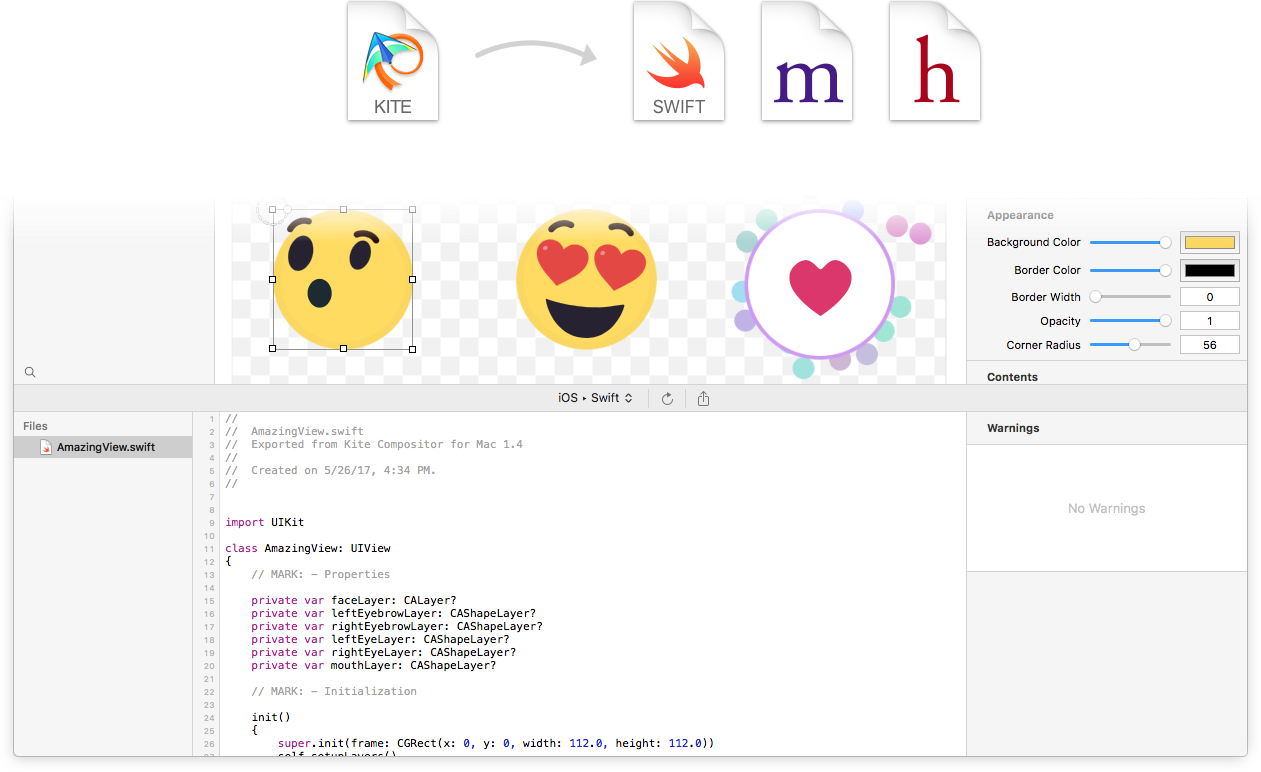
In the 3rd utility pane you'll find the code generation output view. This is where the auto-generated code for your document will appear when you click the Generate Code toolbar button. Generating code for your animations is a great way to incorporate custom animated buttons, progress indicators, HUD confirmations, explanatory animations, and interactive emoji into your apps.
Clicking the generate code button will take your current selection (if no selection, then the entire document) and generate native Core Animation code to recreate your design in a iOS or Mac app. Kite supports both Swift and Objective-C language output types.
All layer and animation types are supported in the generated code. Since Core Animation doesn't natively support user interaction in its APIs, only a limited set of interaction code is generated from Actions. Currently, all actions with a 'Play Animations' response will generate an IBAction method that you can call directly from your own code. Scripts on a layer are not included in the generated code.
When you choose to export your generated code, all of the necessary assets like images and video files are copied to the output directory along with the code files themselves.
The canvas is where you can directly drag, rotate, and resize your layers. It is a preview of what you can expect to see when you present the presentation during playback.
You can drag and drop several different types of media directly on the canvas to create layers directly from images, videos, or music files.
The document window's toolbar hosts a number of useful shortcuts you can use while you are creating a design. It is also fully customizable to suit your needs. Simply right click it and select "Customize Toolbar..." to add, remove, or rearrange the layout to suit your taste.
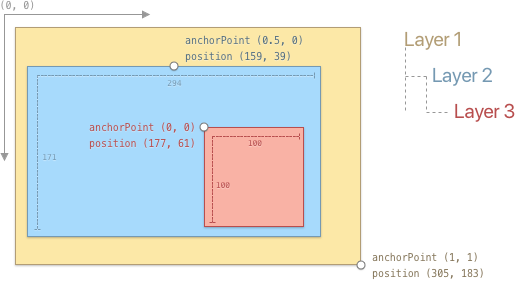
Layers are the key building blocks that allow you to establish the layout and geometry of your scene. Each layer has a position and bounds that creates its own coordinate system. A layer's anchorPoint defines the point by which the layer's position appears in its parent layer. Layers can have child layers that form a hierarchy of parent-child relationships. These relationships influence how movement, animation, and actions take effect on the scene.
The Library has several different types of layers you can add to the canvas. Choosing what type of layer you need depends on what function or effect you want to achieve.
Layer – A general purpose container for other layers or hosting image content.
Text Layer – A layer that hosts rich text capable of displaying different fonts, colors, and text arrangement options.
Gradient Layer – Provides the same functionality of a standard Layer, but fills its bounds with an animatable arrangement of color stops that produce a gradient.
Shape Layer – A layer that defines a BezierPath with a fill and stroke. Useful for defining custom icons, shapes, or geometry you want to animate.
Replicator Layer – A layer that replicates any child layers added to it. This layer can produce some stunning and delightful effects when used in cooperation with animations.
Emitter Layer – A layer that emits particles defined by its child emitter cells. Useful for special effects like rain, fire, or smoke.
Video Layer – A layer that hosts a video or audio file that can be triggered to play during the scene presentation.
Page Layer – A layer that 'stands-in' for another whole Page at design-time. At presentation-time the Page Layer is filled in with the layers of the referenced page. Page Layers allow you to perform fully customizable page transitions using your own animations.
Tiled Layer – Description forthcoming.
Scroll Layer – A layer that provides the basic building blocks for creating a scrollable pane in your scene.
Transform Layer – A layer that doesn't flatten its child layers into a single 2D plane so you can design true '2.5D' scenes and animations.
Animations are objects you add to a Layer to modify its properties over a duration of time. Multiple animations can act on the same layer at the same time to produce complex visual changes to the scene. For example, you could animate a layer's scale and shadowRadius to create a 'lift off of the screen' animation. In addition to animating a Layer's properties, you can also animate a Layer's Filter's properties. This allows you to animate the blur radius on a Gaussian Blur filter, or the time on a Page Curl filter.
Animation Playback
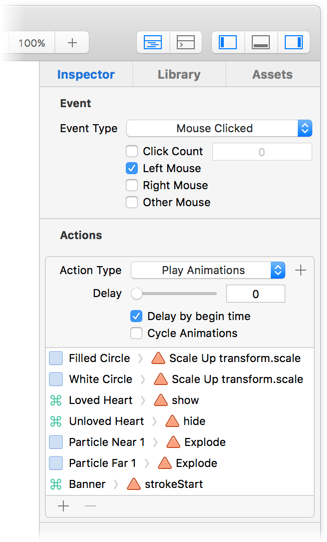
By default, each animation will play at its specified beginTime during the presentation playback mode. This is the playback time you will see when previewing the scene in the canvas editor. Alternatively, you can choose to not have the animation play at its beginTime but instead play when an Action is triggered – like during a mouse click action. To do this, uncheck the 'Plays at Begin Time' checkbox in the animation inspector pane**.
** Note that the animation will still play when scrubbing through the editor even when 'Plays at Begin Time' is not checked. But, it will not play until triggered during presentation playback. To hide or temporarily remove an animation while scrubbing in the timeline, click the Eye icon in the Layer List pane next to the animation.
Animation Types
The library provides four different types of animations you can choose from depending on the effect you're trying to achieve:
Basic Animation – An animation that modifies a layer property from one value to another.
Keyframe Animation – An animation that interpolates between a list of values at specified time intervals. This type of animation is useful for moving a layer's position along a path.
Spring Animation – Just like a Basic Animation but provides paramaters like mass, stiffness, damping, and initialVelocity to tune the springiness of the animation.
Group Animation – This type of animation can be used to group other similar child animations together. For example, you could group a layer's scale animation and shadowRadius animation into a single animation called 'Lift Up'. This makes complex animations easier to trigger in actions.
Actions are one of the key differentiators of Kite as an animation application. With actions, you can trigger animations to play or other actions to fire at at any moment during the presentation playback. This means you don't need to script out every interaction in linear time. You can fire an animation impromptu during a mouse click, key press, pinch gesture, or dozens of other events available in the Action inspector.
Default Provided Actions
Some layers, like a Scroll Layer, come with default actions already setup for you when add them to the canvas. A Scroll Layer has a default action to scroll the contents of its Document Layer when the mouse is scrolled within its bounds on a Mac or when a touch is dragged within its bounds on iOS. A Video Layer has a default mouse click action to play its video content.
The built-in JavaScript scripting environment opens up your animation design to the next level of detail and custom interaction logic. Each layer can have a single JavaScript file associated with it to perform custom pre-setup routines, draw custom image content, and respond to interaction handlers.
These layer script files act similarly to web-based JavaScript code. They can peek into the layer hierarchy and change layer properties. They can observe changes to a property on another layer and take custom actions. They can fire animations, create new animations, trigger actions, add CoreImage Filters, draw bezier paths, set timers, and much more. Just about anything you can think of is possible from the JavaScript API.
Script Files
Scripts are saved inside the document's /Assets subfolder as individual files. This means you can use your favorite external editor to write your scripts and the changes will be picked up each time you present your document.
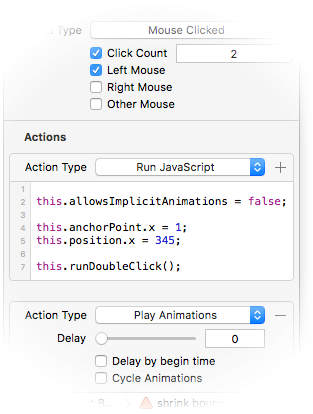
Script Actions
If you simply want to run a short snippet of code in response to an action, you can use the 'Run JavaScript' action instead of using an entire script file for simple scripting needs.
JavaScript Console – Errors and Output
While editing and presenting your design with scripts, you may switch the bottom utility pane to the JavaScript Console view to see any errors or output generated from your scripts.
API Reference
You can refer to the JavaScript API reference to see documentation and examples of the APIs in use. You can also check out several of the built-in example templates provided in Kite (Desktop Dock, TV Photo Album) to see uses of the API in action. To create a new document from a template, in the main menu select File > New From Template....
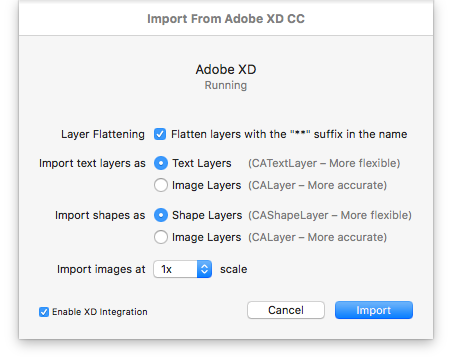
Kite can import layer content from other applications to jump-start your motion design from apps like Adobe XD CC and Sketch. From Kite's main menu bar, you can choose File ▸ Import and select the application from which you want to import layer data.
Currently, Kite supports both Adobe XD and Sketch as import sources. Imported content will become a child layer of the currently selected layer or the root layer if there are no layers selected.
The screenshot below shows the import options for Adobe XD, but these are applicable for Sketch's options as well.
Layer Flattening – When active, all layers whose names end with two asterisks characters, ** , will have their layer hierarchy flattened into a single image. Doing this can improve performance on deeply nested layers where you don't need to animate the individual child layers.
Importing Text Layers – This options trades off accuracy of the original text renderering verses text edit-ability and animate-ability in Kite. Other applications may have more complex text attributes (e.g. line height) that may be best reproduced by an image of the text itself as long as you don't need to animate the text size, color, etc.
Importing Shape Layers – This options trades off accuracy of the original shape path renderering verses shape edit-ability and animate-ability in Kite. Other applications may have more complex shape fills and borders (e.g. multiple fills or multiple strokes) that may be best reproduced by an image of the shape itself as long as you don't need to animate the shape's path, fill color, etc.
Image Scale – When importing image assets, Kite will ask the source application to export assets at this scale. The default is to match the scale of the screen where the app is running.
Enable XD Integration (for XD) – When checked, Adobe XD will have a menu item in the File ▸ Export menu to send the active XD document's content to Kite.
The Layer class API is proxied directly to the Core Animation CALayer API. If you need more information about any property or method, the CALayer API is a great reference.
Turns on or off implicit animations for the layer. If off, changing the layer's properties will not automatically create an animation between the old and new value. Defaults to true
layer.mouseDown=function(event){// This change is animated from the old value to the new value because implicit animations are enabled.this.x=100;this.allowsImplicitAnimations=false;// This change is reflected immediately on the canvas without an animation because implicit animations are disabled.this.x=200;};
A callback function you can set to be invoked when the canvas is ready for initial playback. This is a good place to setup additional content within the scene.
// Called just before the presentation starts//layer.canvasReady=function(event){// Find layers in the layer tree//this.screenLayer=canvas.getLayerByName("Screen");this.dockBackgroundLayer=canvas.getLayerByName("Dock Background");this.toolTipLayer=canvas.getLayerByName("App Tool Tip");};
A callback function you can set to draw custom layer content programmatically via CoreGraphics.
// ------------------------------------------// Called to draw custom layer content// ------------------------------------------layer.drawLayerInContext=function(layer,context){varpath=BezierPath.bezierPathWithRoundedRectXRadiusYRadius(this.bounds,10,10);Color.redColor().set();path.fill();};
Add an observation handler to the layer for a particular keyPath. When this property changes, the changeHandler is invoked. However, the change handler will not be called as a result of an Animation changing the property.
layer.observe("position",function(object,oldValue,newValue){varnewPoint=newValue.pointValue;varnewPosition={x:newPoint.x,y:newPoint.y};// Offset the new position by the shadowLayer's original// offset//newPosition.x+=shadowXOffset;newPosition.y+=shadowYOffset;shadowLayer.position=newPosition;});
The TextLayer class API is proxied directly to the Core Animation CATextLayer API. If you need more information about any property or method, the CATextLayer API is a great reference.
The ShapeLayer class API is proxied directly to the Core Animation CAShapeLayer API. If you need more information about any property or method, the CAShapeLayer API is a great reference.
The GradientLayer class API is proxied directly to the Core Animation CAGradientLayer API. If you need more information about any property or method, the CAGradientLayer API is a great reference.
The VideoLayer class API is proxied directly to the Core Animation AVPlayerLayer API. If you need more information about any property or method, the AVPlayerLayer API is a great reference.
The TiledLayer class API is proxied directly to the Core Animation CATiledLayer API. If you need more information about any property or method, the CATiledLayer API is a great reference.
The ScrollLayer class API is proxied directly to the Core Animation CAScrollLayer API. If you need more information about any property or method, the CAScrollLayer API is a great reference.
The ReplicatorLayer class API is proxied directly to the Core Animation CAReplicatorLayer API. If you need more information about any property or method, the CAReplicatorLayer API is a great reference.
The EmitterLayer class API is proxied directly to the Core Animation CAEmitterLayer API. If you need more information about any property or method, the CAEmitterLayer API is a great reference.
The EmitterCell class API is proxied directly to the Core Animation CAEmitterCell API. If you need more information about any property or method, the CAEmitterCell API is a great reference.
The Animation class API is proxied directly to the Core Animation CAAnimation API. If you need more information about any property or method, the CAAnimation API is a great reference.
The PropertyAnimation class API is proxied directly to the Core Animation CAPropertyAnimation API. If you need more information about any property or method, the CAPropertyAnimation API is a great reference.
The BasicAnimation class API is proxied directly to the Core Animation CABasicAnimation API. If you need more information about any property or method, the CABasicAnimation API is a great reference.
The KeyframeAnimation class API is proxied directly to the Core Animation CAKeyframeAnimation API. If you need more information about any property or method, the CAKeyframeAnimation API is a great reference.
The SpringAnimation class API is proxied directly to the Core Animation CASpringAnimation API. If you need more information about any property or method, the CASpringAnimation API is a great reference.
The GroupAnimation class API is proxied directly to the Core Animation CAAnimationGroup API. If you need more information about any property or method, the CAAnimationGroup API is a great reference.
Get the event's location in the argument layer's coordinate space.
layer.mouseMoved=function(event){varpointInLayer=event.locationInLayer(this);// pointInLayer is now the (x, y) point where the mouse moved// in this layer's coordinate space//console.log("("+pointInLayer.x+", "+pointInLayer.y+")");};
layer.mouseDown=function(event){// Position animation//varposAnimation=newKeyframeAnimation();posAnimation.keyPath="position";posAnimation.values=[{x:0,y:0},{x:400,y:400}];posAnimation.duration=2;this.addAnimation(posAnimation);// Width Animation//varwidthAnimation=newKeyframeAnimation();widthAnimation.keyPath="bounds.size.width";widthAnimation.values=[0,400,200];widthAnimation.duration=2;this.addAnimation(widthAnimation);};
The same property using the additive value on Layer using addAnimationForKey()
layer.mouseDown=function(event){// Position animation 1//varposAnimation=newKeyframeAnimation();posAnimation.keyPath="position";posAnimation.values=[{x:0,y:0},{x:400,y:400}];posAnimation.duration=2;this.addAnimationForKey(posAnimation,"position1");// Position animation 2//varposAnimation=newKeyframeAnimation();posAnimation.keyPath="position";posAnimation.values=[{x:0,y:0},{x:0,y:-200}];posAnimation.duration=2;posAnimation.additive=true;this.addAnimationForKey(posAnimation,"position2");};